
Ever tried driving in a convoy without a UHF radio? It’s a pain in the ass. Plus some 4wd locations you get poor reception because you are in the middle of nowhere.
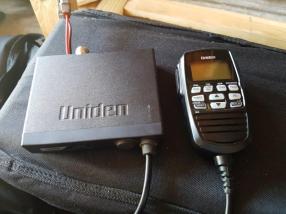
Having spent so much money on the Sport already I headed back to Gumtree for a bargain. I picked up a Uniden 8080S for $120 including antenna and all. These units retail for around $320 to $400. The reasons I went with this UHF was all functions can be accessed by the hand unit which means you can install the control box out of sight. With this unit you also have play back function so if you missed the last 40 transmissions you can go back and listen to them again with a press of a button. Now you may not need to go back 40 but sometimes you just need one more listen to work out what somehow said, especially if they are a fair way away.
Anyone who has installed a UHF before knows they are quite simple. For this unit and for most you have 2 wires. 12v positive and negative. Now there is some discussion about whether to wire up the UHF to 12v constant (on all the time) or accessories (turns off when the car is off). For me personally I hook mine up to an accessories 12v that way if I forget to turn it off, its not going to run my battery flat. I never tested out the current draw but my guess it would not be that high maybe 500mA to 2amps depending on settings and transmitting etc, so it cold take a while to flatten your battery. I have no need to use mine while the vehicle is not on.
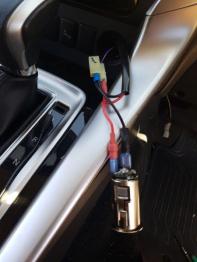 For installation I just tapped into the back of the front AUX socket in the console. This socket is rated to 120w approx 10amps ay 12v so current is not an issue. With some connectors I already had at home, I made up a little flylead so in the future if I ever needed to remove the unit or replace it, it was very simple to do.
I then ran the antenna cable through the grommet up under the dash on the drivers side, same place as I did for my light bar switches. It can be a pain to get through and you might need the help of another person.
Once the antenna wire was run I installed the antenna bracket I bought from Supercheap, this was my first mistake. The bracket was so week that even with it riveted to the inside of my guard and being bolted down still flexed that much it look like a pendulum on a clock. Stupid me went and bought another one from Supercheap and, using my desktop press, bent it so that I could mount it lower thinking it would be more secure. Once again I was wrong. It helped a little but I was still not happy and out of frustration I decided to make my own antenna bracket.
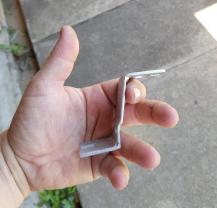
I grabbed some 2mm flat bar steel from the shed, started cutting and welding and within 20 minutes I had a super strong bracket that was the right shape for my bonnet and guard. A quick coat of metal silver and I was happy with the end result. Now it may not look as good as a chrome plated stainless steel one but I can tell you it works and has very little flex. I bolted it to a fender bolt and for extra strength and for off road use I also drilled two holes and riveted it to the inside of the guard.
Next I needed to decide on a location for both the control unit and the hand piece. I found a nice space up under the head unit of the stereo. This also allowed me to run the wire for the hand piece through a recess on the passenger side of the vehicle. The reason for the passenger side is I have phone mount on the drivers side already.


Here you can see the recess on the passengers side where I ran the mic cable through.
I’m sure there are people out there like me, who do not like to drill holes in visible locations like the dash just in case you want to change things down the track. For this reason I made up a little bracket for the hand piece that sits just below the passenger air vent. I did not need the bracket and could have quite easily just stuck the mount directly to the dash however I wanted it in line with the centre console. The bracket is stuck to the dash by 3m tape which is holding up quite well.
That completes the installation of the UHF. If you have any questions please let me know and feel free to check out my other modification posts.


Did u drill a hole to feed the mic cable thru the passenger recess ?
LikeLike
Hi. Yes correct. Just big enough to get mic cable through.
LikeLike
Hi, how did you get access to the space under the stern head? was it by removing one of the side panels of the centre console?
LikeLike
By removing the head unit surrounds.. by pulling the shroud aroundt the airvents and removing the trim. Not the centre console.
LikeLike
Ok, I will give that a go. Tx
LikeLike
How did you get the cigarette plug out of the console?
LikeLike
Re drilling to allow access for the mic cord….did you simply use a long bit and drill through the recess or did you come in from the rear after removing the head unit surrounds.. by pulling the shroud around the airvents and removing the trim ? Cheers
LikeLike
I drilled through from the recess.. 🙂
LikeLike
Ta. Was there anything behind to be wary of ?
LikeLike
Ta. Was there anything behind to be wary of ?
LikeLike
Not that I recall
LikeLike
Thanks Again
LikeLike
No dramas. Any time.
LikeLike
How did you remove the cigarette lighter plug out of the console to connect 12 V extension?
LikeLike
If I recall there is a little clip you push back in side the socket using a non conductive tool so you dont accidentally short it out or remove the fuse prior.
LikeLike
Thanks – very helpful.
LikeLike
Thanks for taking the time to write this up and for posting. Was trying to think of the best non destructive option and think you’ve already nailed it.
LikeLike
Hi there, I can’t seem to find the grommet to run the antenna cable through the firewall. The only grommet I see is nearly impossible to get at, it is near the centre in the engine bay.
Any chance of a photo or description of where to get through the firewall will greatly appreciated.
Thanks
LikeLike
Hi. Is on the drivers side virtually directly behind the push button start maybe a tad higher. You can see it easily from the engine bay.
LikeLike
Awesome thanks, I could not see it from within the cabin and was looking at another grommet within the engine bay more in the centre but very much inaccessible.
LikeLike
Hi, thank you for the great article. Did you have to remove the sides to the floor console (where the cable comes through).
LikeLike
Hi, it was such a long time ago. But if I recall I managed to do it all without actually removing them.
LikeLike
Your site is the best resource I’ve found for mods to my sport. A quick question regarding the mounting to the underside of the head unit. How tot you manage this? Did you remove the head unit and bolt it on? I was scratching head at how you managed this, in such a small space. I really appreciate your help on this. Many thanks in advance – James
LikeLike
Hey mate, It was quite a while ago, but I did not remove the stereo head unit, I would have gained access by removing the passenger right kick panel and installed it that way. You can install it in any spare space, I dont think its as high up as the head unit. Cheers
LikeLike
Hi, thanks for this site. It’s so useful. I was wondering how you mounted the unit to the underside of the stereo head unit? I’m scratching my head at this a bit. Many thanks in advance for your help. Cheers – Jim.
LikeLike