Warning: this post will be picture heavy!
How awesome are 4×4 storage drawers!!! There is nothing worse than having to unpack your cargo just to find something you put right at the back.
Why did I decide to make my own vs buy some ready made drawers?
1. Generic made drawers did not allow for access to the spare wheel locking nut.
2. I needed somewhere to put my auxiliary battery because as per my rocker bar post the factory location was being used.
3. I needed somewhere to mount my air compressor as I did not want to take it in and out when inflating my tyres / pressurising my water tank etc.
4. I hate thing sliding around the back of the vehicle when I’m driving.
Because I needed to mount the Aux Battery and Compressor, I measured up and went with some 600mm drawer sliders purchased from Dunn & Watson. They were $66.00 and were rated for 60kg. I could have went the 120kg or bigger but because its only 600mm there’s no chance I’ll go over the 60kg.
I found a 105aH GEL battery and Ctek D205S charger on Gumtree for $250.00. I took a bit of a risk with the battery because you never know how they have been treated, but it seems to be going fine fingers crossed, and all tests have shown it to be in good condition. This saved me about $200.00 or so.
I already had a Thumper Max dual air compressor which I pre-ordered from 4WD Supacentre when they first advertised them. Word of warning.. this air compressor is quite large and heavy compared to the smaller ARB one I previously had. That being said, damn it’s fast. I aired up my vehicle and another before a mate had finished airing up his with a different compressor.
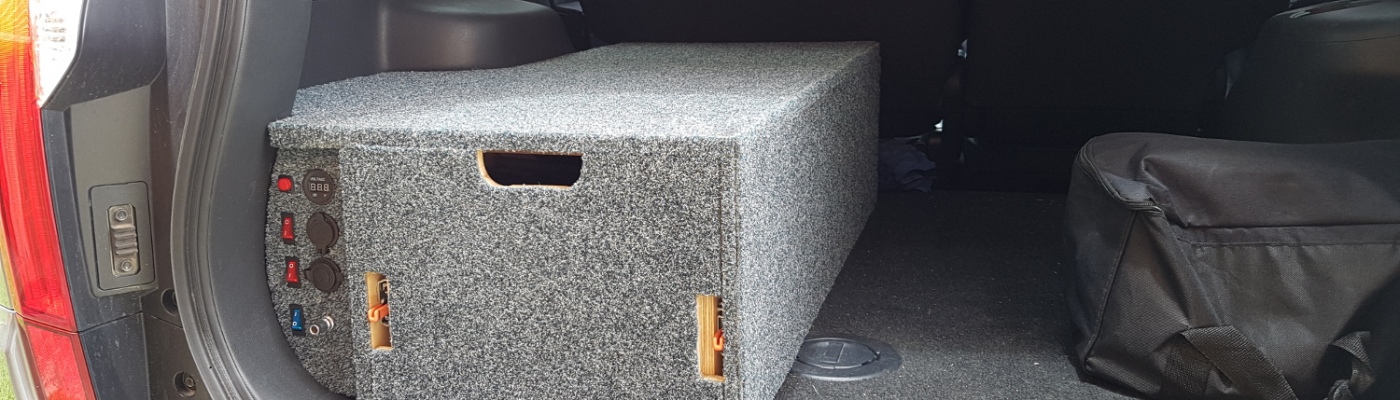
Some other things I wanted was USB ports, aux plug volt meter and of course, to have everything switched and fused.
I quickly measured and knocked up a basic drawer.


I mounted the 105aH battery at the back and then the air compressor by removing the stand and screwing the feet into the bottom of the drawer. I installed the battery on a standard battery tray which I picked up for $25.00.
I installed the drawer sliders, measured and knocked up a drawer.

I had some marine carpet laying around so with some contact adhesive I covered the drawer. It was a bit of a rush job but it turned out ok in the end. I made it so that I could remove the top easily so I’d have access to the battery and/or air compressor.
Because I also wanted to use the air compressor for other things, like pressurising my water tank down the track, I decided to add remote functionality.

I purchased a 433mHz wireless relay from a Chinese website . I think it was $8.
*** Caveat – All electrical work should be performed by a qualified person ***
I tapped into the switch on the air compressor and added the remote relay. I did not disconnect the switch as I wanted the ability to still manually turn it off and on, should the wireless Chinese switch fail (it was $8!).
So once this was done I started adding my electronics to the drawer. I installed the DC to DC charger then run and indivually fused each wire. I could have bought a nice fuse box from Jaycar for $30.00 but I was being cheap and bough some blade 3 blade fuse holders for about $1.50 each. The fuse box would have been neater but I wanted to make this as cheap as possible.
I forgot to mention that because the compressor can get hot so I installed a fan to circulate the air while its running and for after to cool it down.

Here is the 90% finished wiring. Still missing solar input, alternator input and battery output for a fridge.


The box to the left of the fan the wireless relay and I also added an easy second switch to manually switch the compressor on.
I extended the air hose on the compressor so that I had an easy outlet on the drawer. Simply plug in an air hose and instant air. No more setting the compressor up. The compressor came with a 4m extension which is plenty to do my Sport and the vehicle behind too.
As a late addition I also decided to add some in drawer lighting so that when you opened the drawer the internal light would automatically come on. I installed an override switch too, of course.
Here is the video of the final product before installing.
Note – Email recipients, to view this video you will need to click on the blog post title and view in a web browser.
Stand by for Part 2 which will cover installing, running additional 12v aux outlet and solar input, etc.

G’day, this is exactly what I’m looking at with our brand new GLS. Just one question, why did you choose the left of the vehicle? My inclination is to put it on the right, with fridge on the left.
A second question, how thick is the ply you used?
I love your blog and have bookmarked it already. I have 6 weeks to get our rig ready for Birdsville so need all the shortcuts I can find.
LikeLike
Hi Geoff. I wanted to off set the drivers weight when only one person was in the vehicle. I have since installed a fridge slide on the top of the drawer as the fridge was taking up too much space on the right. I can update the photos of it if you like.. Ill get back to you with the size of the ply but if I recall it were 12mm.
LikeLike
Hi mate I love your site and you certainly got some skills there. That box is awesome. Question if I may, how did you run the power from the front battery to the DC to DC charger?
LikeLike
Hi. Unfortunately I have some bad news for you. I never ran power from the main battery. I used solar to charge the Aux battery as it was only running my fridge and air compressor. The majority run the wires in the chassis rail. I would do that and then run it into the vehicle under the passenger side rear bumper. That’s where the tow harness goes if I recall correctly.
LikeLike
Hi I really loved your article, it was very informative and will help me a lot with how I can handle my future conversions. Loved it mate.
LikeLike