
Having lived out west for a few years you realise how important good lights are if you have to travel anywhere at night. Those little buggers tend to wait in the shadows and jump out when it’s too late to stop.
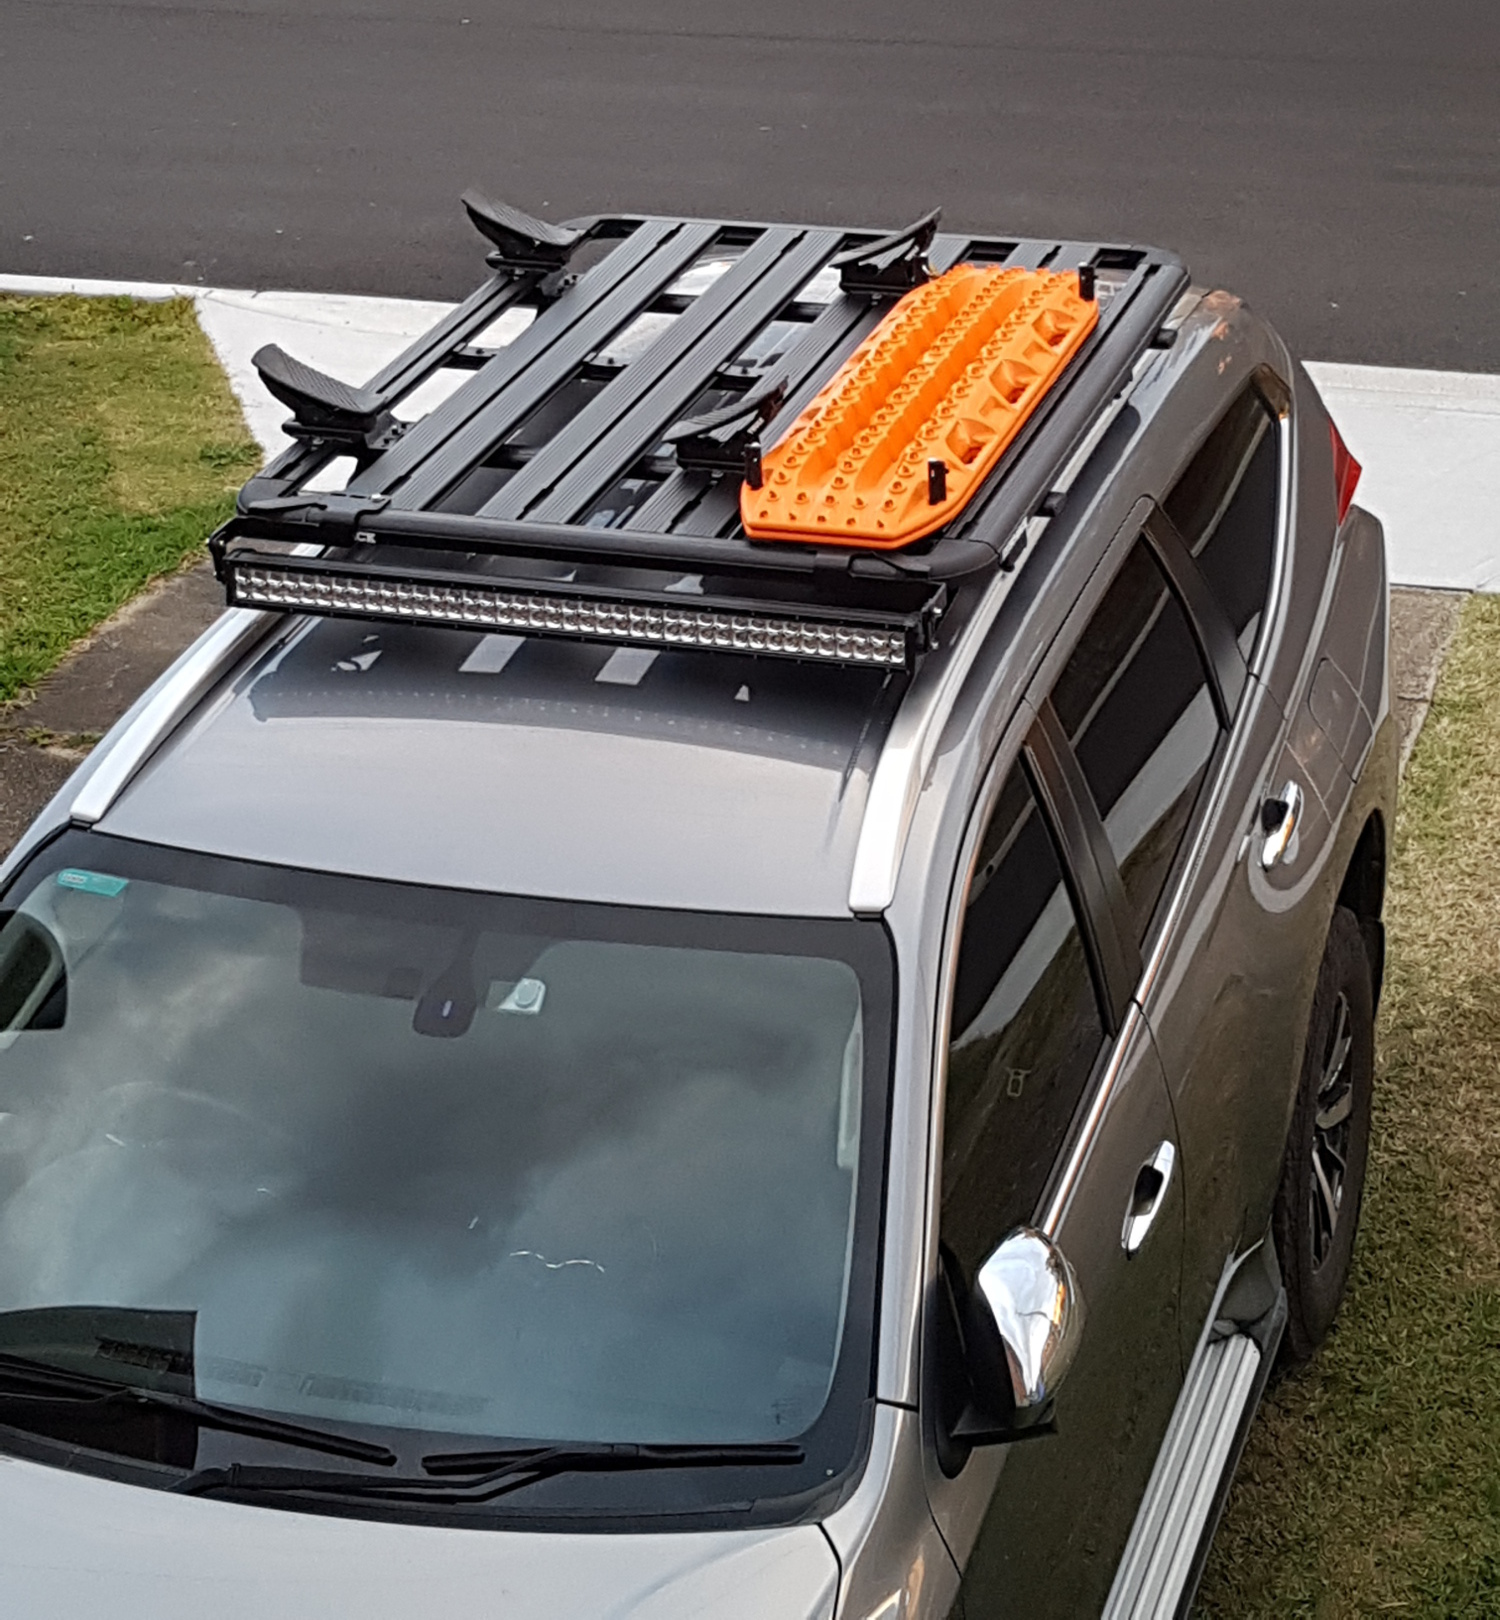
I decided I wanted a light bar mounted to the roof so I went and bought some LED brackets to fit my pioneer rack. Unfortunately through their design the brackets only allow you to fit a 32 inch (ish) light bar, which I did. I was not happy with it because it dit not go all the way to the edges of the rack. I decided to modify the bracket to allow me to install a 40 inch light bar. I took the original brackets, extended them and added supports.

Now im sure there is a reason why they only make brackets for a smaller light bars but to this day I have not seen any issues with either the rack or the brackets that I modified.
Light bar was purchased from 4wd Supacentre for about $80.00. 4WD Supacentre
Light bar brackets from roof rack city for about $75.00 Light Brackets | Rhino-Rack
I bought a light bar switch from On Boar Air, they are not cheap but they fit nice. I think it was around the $28.00 mark plus postage. AOB Home page – Air On Board

The other good thing about this setup is that it sits lower then the platform so it does not get in the way of loading long things like kayaks etc.

For those wishing to tap into the high beam light I found an easy spot on the fuse box under the bonnet.

The end result –


Hey mate, really like what you have done with the PJS and the website…great work! I’m looking at roof mounting a light bar on mine and was after some tips on how to run the cable through the firewall and then up through the roof rails onto the roof.
Photos would be great if you have them as well. Info on these is still pretty limited on the forums so would really appreciate the help here.
LikeLike
Hey mate. The light bar wiring runs up the drivers side of the windshield and then into the roof rail coming out under the forward roof rack. The only wiring that goes through the firewall are the switching wire. This went through the grommet on the driverside right of the steering wheel. Hope this helps. If you need any thing else let me know. Cheers.
LikeLike
Hey mate, your light bar install looks awesome. Did you have to go to a metal fabricator to get the brackets modified? Also would you be able to show us some pictures of how you rang the cables from the tray to the windscreen gutter?
LikeLike
Thanks mate. I modified them myslef pretty easy to do with basic skills. The wires run up the drivers side window. I’ll add some pictures to the post for you.
LikeLiked by 1 person
Uploaded a photo to the end of the blog for you.
LikeLiked by 1 person
Thanks for that. Looks like you went the effort removing the factory rails to run the cable. Once under the rail, did you may use one of the roof rack mounting holes to poke the cable out to?
I am hoping to do the same when mine using the Adventure Kings 40 Godfather lights. I have installed the same Rhino Rack Pioneer Tray that you have.
LikeLike
Correct. I removed the front rail end cap and drilled a hole in the next section so that I could run the wire in the rail and then bring it out at the roof rack. I just used some black sikaflex to hole the wire down on the side of the window which has worked fine.
LikeLiked by 1 person
I attempted the install last week but had trouble removing the rails. How did you remove the middle and front rails? I have removed the single hex head screw but the rails seem to still be secured somehow. Thanks again!
LikeLike
I only removed the front one. The rear of the front unclipped then you slide it forward. You will need to leaver it with a plastic tool. I used a plastic door trim removing tool. I actually did not remove the next one. Just drilled a hole in the centre piece to feed the cable through and then drilled where I wanted the cable to exit. I then fed the wire through with a coat hanger..
LikeLike
Great page btw!
So the front section do you lever it upwards to then slide towards bonnet or level it towards bonnet ? Having issues removing this section and find video anywhere isn’t a success
LikeLike
Its been quite a while. If i recal its leaver it towards the back of the selection and then slide it forward towards the bonnet..
LikeLike
Hi, This is a great blog and has given me lots of tips. I have installe and wired a light bar exactly as in the blog but I am not sure where the grommet is to pass switch wiring through the firewall and into the cabin. Any chance of of pic to help a novice like me? Thanks.
LikeLike
Awsome I will give it a go tomorrow.
LikeLike
On an unrelated but related topic, how do you find the wind noise that the Pioneer tray? It’s the first time that I’ve had a roof tray on a car and the wind noise/turbulence is very pronounced in the cabin.
LikeLike
It’s noticeable but you get used to it so now I don’t even know it’s there now.
LikeLike
Nice job. What size wire did you end up running and roughly how long was the cable route?
LikeLike
Thanks. I just used the wiring harness from 4wd Supacentre. Just modified it to suite tapping into the fuse box,
LikeLike
Hey mate. Nice job on the install…looks good. I have the Kings Plug n Play Smart Harness. To tap into the fuse box…am I correct in assuming this negates the need for the piggy back adapter and you just clamp the red n black wires straight into the fuse box? Is there a particular clamp required to go into the fuse box?
Sorry for the basic questions mate…but I’m no auto leccy as you can tell…appreciate any help you can offer. Thanks.
LikeLike
You so not need the plug and as it will not fit the PS. By tapping the high beam wire in the fuse box, when lights are switched on it energises the relay powering up the spotlight / light bar. So if I recall your 12v will come from your battery with the single switching wire in your fuse box……
LikeLike
This forum has been so useful. I have just about completed the install of my driving lights, but now have a question re the switch. I can see the grommet on the firewall to bring my cable through, however how do I access this area in the cabin. How much of the trim and which parts do I remove to put the switch in. Do the blanks just pop out? Thanks in advance
LikeLike
You will need to remove the panel where the push to start button is. That will give you better access but you will still have to lie on your back to get access to the grommet. The blank should just push out from the inside. There may be a wire plugged into the back just pull that out and tape it up. If you order the switched linked in the blog it will just push right into the hole.
LikeLike
I just had a quick look at the push to start panel. There are the two screws at the bottom, how is the top fixed. Do I have to disconnect the fuel cap lever? Any further guidance appreciated. I have ordered that exact sw
LikeLike
Thanks for your great blog. I have installed a light bar at the front of my roof rack just as you explained. Have done all the wiring and installed the Air On Board switch. All tested and working. But I’m not sure where to run the wire through the firewall. Looking at the firewall from the front of the engine I see a large grommet to the ;left of the steering wheel. Not sure if this is the one you are referring to? I removed the switch panel from inside the car but cannot see the grommet from inside. Just wondering if you can post a photo of the grommet you used so I can identify it.I am worried about damaging wires by poking through the wrong grommet or in the wrong place.
LikeLike
Hey mate I emailed you a photo. That is the correct one. On the inside its up higher then you think. You have to get right under to see it, may even have to pull a panel off to get to it from the inside.
LikeLike
Mate I’m not near my rig at the moment but from memory once you remove the 2 screws pull out at the bottom and pull down it will pop out. I think I also lowered the panel to the left to.
LikeLike
Panel came out just like you described thanks. Wires are through grommet, only question now is my switch has 4 wires. 2x red/ yellow, green, black. The wiring from light has 3 red white and black.. Any ideas which to which ?
LikeLike
From memory the switch will have earth, 2 switching wires and a light wire for night time when your head lights are on. You can just piggy back one of the other switches beside it for the lighting wire. Black will be earth and I suggest green might be your light. Nothing on the packaging ?
LikeLike
Hey , love the install … when you put the pos+ to the fuse box instead of the high beam active was that an aux spare so is seperate from the high beams and only switches on independently? Thanks
LikeLike
No, its linked to the High Beam so that the spot lights only turn on when High Beam is on.
LikeLike
Hey Mate, really like the website and your rig. Well done. A quick one – tapping into the high beam via the fuse box. I have located the point you have used to switch on off using high beam. What end piece did you crimp onto the cable and where did you get it? Thanks.
LikeLike
Thanks mate. I cut down a spade terminal crimp as they are smaller then usual. Just bought from supercheap… hope that helps.
LikeLike
Hey mate. I am now in the process of installing a light bar on my PS (thanks to this post lol). Now just a question regarding tapping into the high beam in the fuse box. Did you just plug the high beam positive (red) cable into the fuse box? Where did you install the negative (black) cable?
LikeLike
Sorry mate. Missed this message. The wire to the fuse box is a signal switching wire. When you turn your high beam on it switches the relay on. So you should have + and – wires also.
LikeLiked by 1 person
Hey mate. Installation done. ☺
I ended up using this to tap into the fuse box which made the install much easy (https://www.jaycar.com.au/double-mini-blade-fuse-socket-wire-tap/p/SF5125). I just wired up the negative cable directly to battery. Since the wire tap has double due socket, the light bar switch is also fused.
Now I’m thinking of adding a small 20-25W work light to light up the side of the car. Not sure if those need to be hooked up to high beams as well since it’s only throwing light from the side of the car.
LikeLike
No. The side light can be separate to your high beams.
LikeLike
Hi Mate, great site, busy kitting my PS out with similar mods. Can you tell me if you required a MM harness or if you used the harness supplied with the light bar? Cheers
LikeLike
Hey mate, I used the harness that came with the light bar.. and tapped into the fuse box high beam.
LikeLike
awesome bit of information for the high beam active, just started to kit out my new wagon, nudge bar, snorkel, roof racks( making an alloy flat rack), looking at suspension. yours sits nice, what do you have under it
LikeLike
Thanks mate.
This is what I have done plus airbags in the back so I can adjust the level as i see fit.
https://thepajerosport.com/2016/12/04/2-lift/
LikeLike